
We have a fun craft for your today! We are going to show you How To Make This Felt Christmas Tree and Ornaments For Kids! This tree wall hanging project is one that toddlers and kids will love to decorate – and they do it safely! This version is built to last for years and through multiple children. This tree is sewn to a background and hung with a dowel so it can be easily put up and taken down each year. It also ensures the tree points won’t fall over time with heavy use.

The various ornaments and presents are fun to create. Older children can help with them too. It serves as a sensory activity that toddlers love. Hang the tree at their height so they can visit it over and over again during the holiday season. If you are looking for other fun Christmas DIYs then check out our post on easy Christmas sewing projects for beginners.
What You’ll Need:

- Craft Felt
- Spray Adhesive
- Dowel
- 1.5 yards Green Felt
- 1.5 yards Background Felt (White)
- 36″ Wood Dowel Rods (2)
- Ric Rac Trim
- Puff Paint
- Scissors
- Straight Pins
- Hot Glue Gun with Glue Sticks
- Rotary Cutter/Cutting Mat/Acrylic Ruler (Optional)
- Iron/Ironing Board
An iron, ironing board and sewing machine are also used for this project.
How to Make the Felt Tree Background
First, you’ll want to decide how large you want your tree to be. Consider the amount of wall space, as well as the height of the children using the tree. I had three children that I knew would want to play with the tree, so I made mine rather tall. Be sure to also account for an extra two inches on the top and the bottom for the casings.
Once you’ve decided on a size, it’s time to get started. Square the fabric, then measure and cut your background to the desired size. Remember to add room at the bottom for presents and the top for the star!

Fold the top of the background felt down 2” and pin all the way across.

Stitch along the raw edge of the fold with your sewing machine, very close to the edge.

Fold the bottom of the background felt up 2” and pin.

Stitch very close to the raw edge of the fold once again. You’ll now have two casings!
Fold the green felt in half lengthwise (hot dog style!).

Using a white piece of chalk, lightly sketch half of a Christmas tree shape from the fold. Don’t be afraid to re-mark if you want to change it a little! You can see my markings from that very thing!
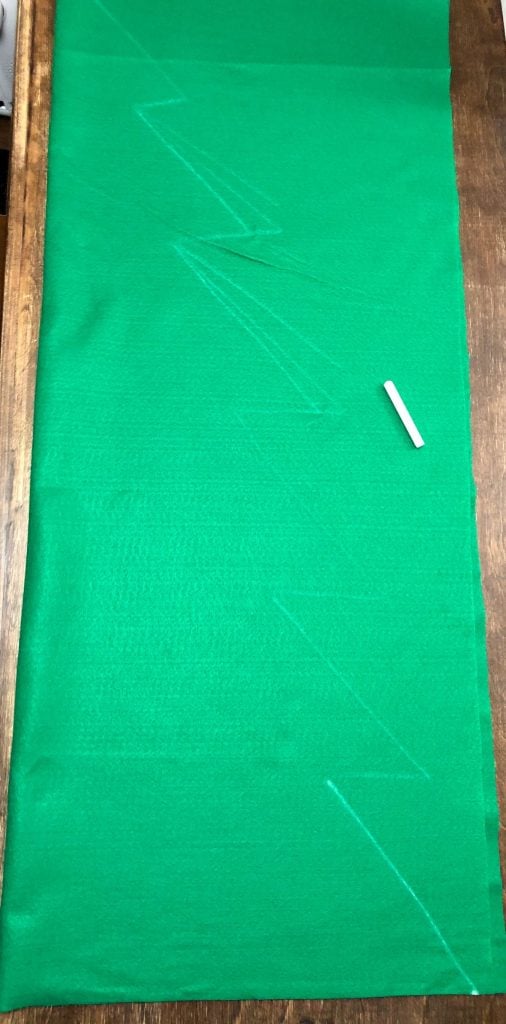
Carefully cut along your traced shape. You’ll be cutting through two layers of fabric, so hold the fabric still and use caution. Add a few pins to hold it in place if you feel the layers slipping.

Unfold your green felt to reveal your tree!

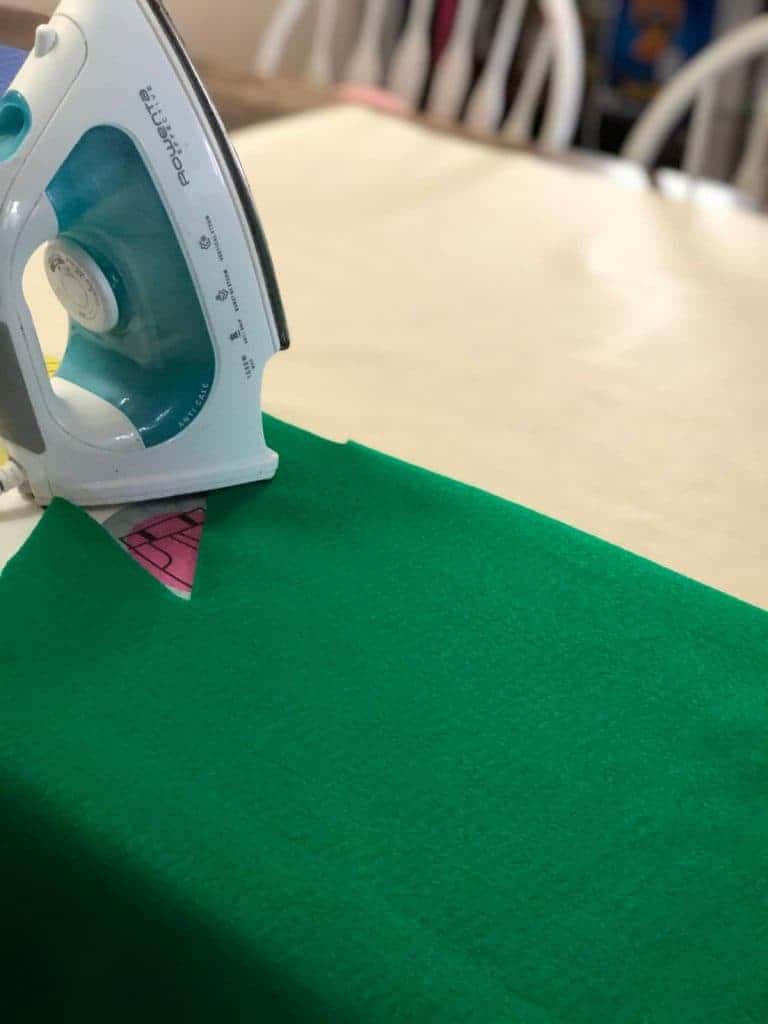
Press the tree and background to remove wrinkles.
Place the tree on the background felt where you want it to go. Lifting up sections at a time, lightly spray the underside with spray adhesive. Be careful – this stuff is sticky!

Press down all across the tree. Pin at the end of each point to hold them down.

Cut a 6” square of brown felt for the tree stump. Spray the underside with spray adhesive.

Tuck the stump under the bottom of the tree about 1”. Press it into place.

Using coordinating thread, stitch the tree and stump onto the background felt. You’ll want to sew very close to the edge of the tree and stump to keep these pieces held down throughout heavy use.

Next, divide the width measurement of your background piece of felt into thirds. Cut a vertical slit at 1/3 and 2/3 of your width in the top casing. (See photo below.)

Insert a wooden dowel into each casing (top and bottom). Set the background aside for now.

How to Make Felt Ornaments, Presents and Star Tree Topper
To make the ornaments, first decide which shapes you’ll want. Most shapes can be free-handed, but you can also trace your shapes using the bottom of a drinking glass, cookie cutters, or use a printable template.

Cut each ornament shape out of your desired colors of felt.

Then decorate each ornament to your liking! Use a variety of mediums, including layering pieces of felt, sewing on trim, and puffy paint. You can hot glue most pieces on but sewing is also great if you’re worried about durability. I also found it easier to glue pieces on and trim around the edges after getting them glued down.

The photo below shows a variety of felt ornaments for inspiration. Get creative with them. If there are older kids involved, they can make their own ornaments.

For the presents, cut squares and rectangles of varying sizes. Use trim or coordinating felt to decorate the presents with bow and/or ribbon shapes.

Here are some examples of presents that have been cut out and decorated.

Don’t forget the star for the top! It star should be a bit larger than the ornaments. Decorate this as you wish as well. I made it with two layers of felt for stability, and sewed some Ric Rac trim around the perimeter.

After creating all of your ornaments, presents, and the star, lay them all face down on top of a piece of newspaper or freezer paper.

Now spray the backs of all of the pieces with spray adhesive. Let them dry for at least 30 minutes. This helps tremendously with the felt pieces sticking to the tree!

Once you have all of your pieces, hang the tree in your preferred location. Place the decoration pieces in a basket or box by the tree.

Grab a cute kiddo and let them go to town! This is a great sensory activity, as well as a distraction from the “pretty” Christmas tree that they shouldn’t touch!

If your pieces begin to not stick as well, simply give them another spray of adhesive and they’ll be good as new!

Don’t forget to pin this project for later, and check out some more holiday felt crafts for Christmas below.

Felt Christmas Tree and Ornaments for Kids

How to make a reusable Christmas tree wall hanging for kids and toddlers to decorate with felt ornaments.
Materials
- Craft Felt
- Spray Adhesive
- Dowel
- 1.5 yards Green Felt
- 1.5 yards Background Felt (White)
- 36" Wood Dowel Rods (2)
- Ric Rac Trim
- Puff Paint
Tools
- Scissors
- Straight Pins
- Hot Glue Gun with Glue Sticks
- Rotary Cutter/Cutting Mat/Acrylic Ruler (Optional)
- Iron/Ironing Board
Instructions
- Determine size of tree, including star and presents.
- Cut background felt to size.
- Fold top and bottom under 2". Pin.
- Sew along top and bottom edge to form casings.
- Fold green felt in half lengthwise.
- Sketch out tree shape with chalk.
- Cut out tree.
- Press tree and background.
- Spray adhesive to back of tree.
- Adhere tree to background.
- Pin points of tree until dry.
- Cut 6" brown square for stump.
- Spray and adhere to background.
- Sew around tree and stump with coordinating thread.
- Cut vertical slit at 1/3 and 2/3 of the top casing width.
- Insert wooden dowel into top and bottom casings. Set. aside.
- Make ornaments by tracing shapes from a cup, cookie cutters or a printed template.
- Decorate as desired.
- Cut various sizes of rectangles to form presents.
- Decorate as desired.
- Draw and cut out star.
- Lay ornaments, presents and star face down on newspaper or freezer paper.
- Spray backs with spray adhesive.
- Let dry at least 30 minutes.
- Hang tree.
Notes
The dowel makes the tree easier to hang and take down every year. However, you can leave it out and use other means for hanging your tree, such as push pins or tape.
Recommended Products
As an Amazon Associate and member of other affiliate programs, I earn from qualifying purchases.
-
 Grabbit Magnetic Sewing Pincushion with 50 Plastic Head Pins, Lime Green
 -
Wooden Dowel Rods - 3/8" x 36" Unfinished Hardwood Sticks - For Crafts and DIY'ers - Craftparts Direct - Bag of 25
-
flic-flac 48PCS 12 x 12 inches (30 x 30cm) Assorted Color Felt Fabric Sheets Patchwork Sewing DIY Craft 1mm Thick … (30cm 30cm, 48pcs)


