
In the summertime, one of my go-to treats is a pint of ice cream. Specifically, Ben & Jerry’s Half Baked has become my favorite. The only downside is that the ice cream makes my hands cold and the condensation gets messy. So, I came up with a simple little sewing project to help. Today on Beginner Sewing Projects, I’m gonna show you how to make this DIY Ice Cream Pint Cozy! This is a quick and easy project. This would be a great project to complete with kids so they can personalize their own cozies with their choice of fabric. The ice cream cozy keeps your hands from getting cold while enjoying your favorite pint-size ice cream and helps cut down on the mess. Plus, you can make this in less than half an hour so you could go buy your fabric and still be enjoying the fruits of your labor in the same afternoon. I will be making one of these for the whole family. Why not, they are so cute and it makes our treat nights even more special. You can also use these for other things like those little soup cup meals or noodles. It works great with hot or cold items.

For this project, you’ll only need a few supplies. You’ll need some fabric for the main body and the lining. You’ll also need some insulating fabric to keep your hands from getting too cold as well as some matching thread. You’ll also need a pint of ice cream to use to make a template for your fabric. As far as sewing tools, you’ll need some scissors or a rotary cutter, mat, and ruler, something to mark your fabric with, an iron, and other basics like pins and a sewing machine. Gather up your supplies from the list below and let’s get started!

What You’ll Need:

- ¼ yard of Main Fabric
- ¼ yard of Lining Fabric
- ¼ yard of Insulating Layer (optional)
- Ice Cream Pint of your choice for Template
- Matching Thread
- Scissors
- Rotary Cutter, Cutting Mat, & Ruler
- Washable marker
- Sewing Machine
- Iron or heat press
- Thread Clippers
- Sewing Clips
- Needle
DIY Ice Cream Pint Cozy

Step 1: Create Template
You can easily create your own template by using an old ice cream pint container. Make sure the container is washed and dry before starting.Using scissors or an exacto knife cut out the bottom of the container. You will not have to use the bottom for your template, so its okay if the bottom gets messed up.

Once the bottom is cut out, cut the “seam” of the container.

You can now lay the side flat and trace it onto a piece of paper.

When you cut out your template, be sure to cut about ¼” past your template to allow room for a seam allowance. This cut-out will be the template for your main piece.

Step 2: Cut Fabric
Cut 2 3” x 3” pieces out of outer fabric for the bottom, cut 1 4” x 3” piece out of outer fabric for the handle, and cut 1 main piece out of outer fabric and 1 main piece out of layer fabric.


Step 3: Construct Handle and Bottom Straps
To construct the handle and two bottom straps you will fold each piece in half and press to create a middle crease. For the handle piece, make sure that you are folding lengthwise.

Next, fold one side of the piece up to the middle crease, and then fold the other side to the middle piece.

Last, fold the two sides into each other. Do this for both bottom pieces and the handle. Pin or clip together and then sew a straight stitch down the side to hold in place.

Step 4: Prepare Bottom Straps
Place the main outer fabric right side up. Find the center of the main piece and clip one strap so that it is laying mostly on the main piece. After, find the quarter by folding a side into the middle and place the second bottom strap on that mark. Baste the bottom straps onto the main fabric.

Step 5: Prepare Main Piece and Lining Piece
Fold the main piece and the lining right sides together. Pin or clip and then sew edge with a ¼” seam allowance.

Step 6: Sew Handle On
Turn the outer main piece right side out. Place the handle on the seam of the outer piece. Pin handle on the bottom and top of the main piece. Baste stitch to stay in place.

Step 7: Press Top Raw Edges
On both the outer main piece and lining main piece, fold down the top edge 3/8” wrong side to wrong side. Press for fold to stay in place.

Step 8: Sew Bottom
Start by placing the outer piece inside the lining piece with right sides together.

To make this step a little easier, you may want to roll the lining piece down starting at the top. Leave about an inch of fabric at the bottom of each. In addition, tuck the bottom strips to be between the two fabrics.

Start by pinning the fabric by the sewn-on straps. Then, you are going tuck the outer fabric in a bit and bring one of the straps directly over to the other side. Pin this between the outer piece and lining. Do the same with the other strap. This should create an “X” with the straps. Sew around the bottom which will secure the outer piece and lining, and this will also secure the bottom straps.
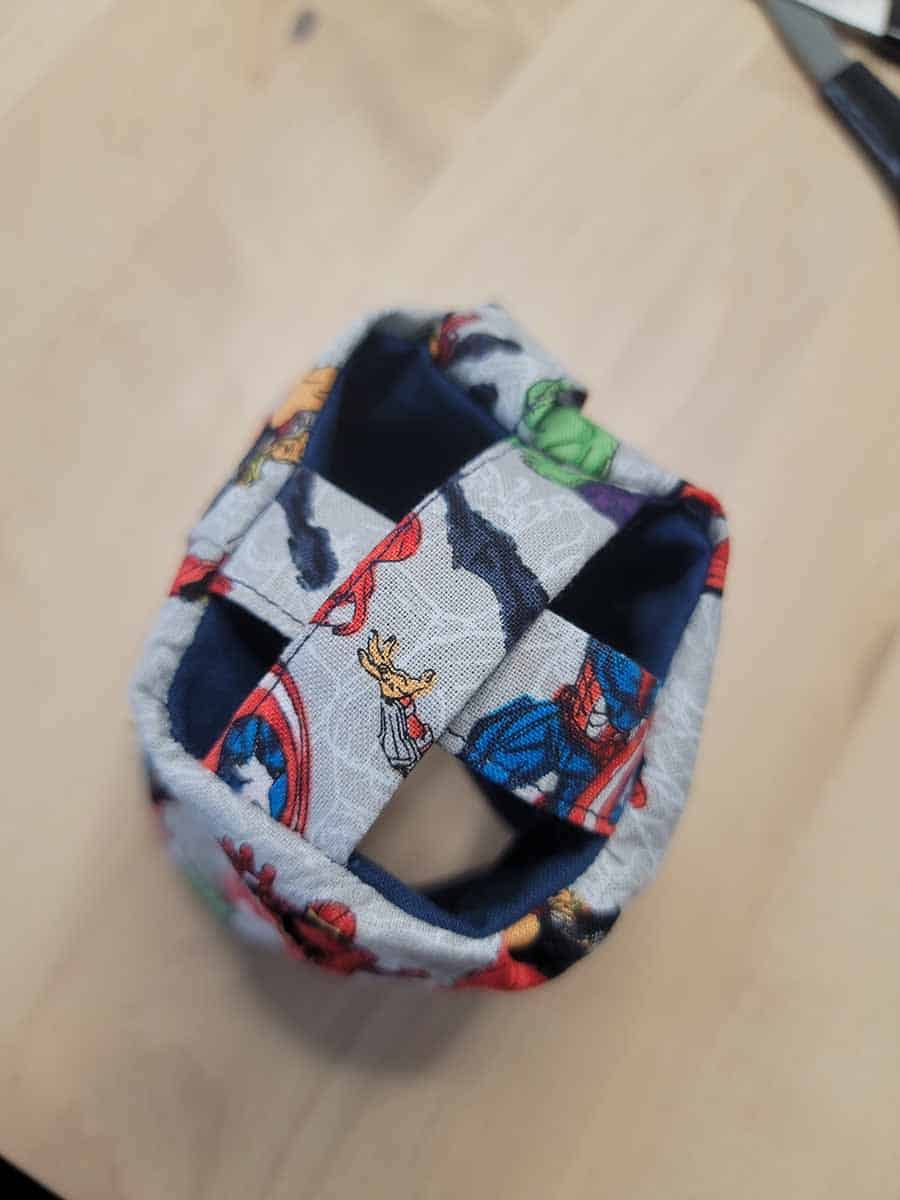
Once sewn, flip right side out, which should have the bottom of the project looking like the picture shown.

Step 9: Topstitch the Top
Last, pin the folded and pressed top pieces. Make sure that the top piece is completely folded over on both the lining and outer piece. Topstitch around the entire top to secure the two pieces together.

And that’s it! Now you know how to make your very own DIY ice cream pint cozy! Perfect for family movie nights, or anytime you want to enjoy a delicious treat without your hands getting cold or wet.

If you liked learning how to make this DIY ice cream pint cozy, make sure to pin it to your favorite Pinterest board or share it with friends on social media. If you decide to make this simple project on your own, be certain that you take a picture afterward and tag us on social media as we love seeing the fabrics and color choices that people use!
DIY Ice Cream Pint Cozy

Enjoy your favorite ice cream with this little cozy. Cute and works great!
Materials
- ¼ yard of Main Fabric
- ¼ yard of Lining Fabric
- ¼ yard of Insulating Layer (optional)
- Ice Cream Pint of your choice for Template
- Matching Thread
Tools
Instructions
- Make sure the container is washed and dry before starting.
- Using scissors or an exacto knife cut out the bottom of the container.
- Once the bottom is cut out, cut the “seam” of the container.
- You can now lay the side flat and trace it onto a piece of paper. Be sure to cut about ¼” past your template to allow room for a seam allowance. Use it to cut one 1 main piece out of outer fabric and 1 main piece of your lining layer fabric.
- You’ll also need to cut two 3” x 3” pieces out of outer fabric for the bottom, one 4” x 3” piece out of outer fabric for the handle.
- To construct the handle and two bottom straps you will fold each piece in half and press to create a middle crease. For the handle piece, make sure that you are folding lengthwise.
- Next, fold one side of the piece up to the middle crease, and then fold the other side to the middle piece. Last, fold the two sides into each other.
- Do this for all pieces and pin or clip together and then sew a straight stitch down the side to hold it in place.
- Place the main outer fabric right side up. Find the center of the main piece and clip one strap so that it is laying mostly on the main piece.
- Find the quarter by folding a side into the middle and place the second bottom strap on that mark. Baste the bottom straps onto the main fabric.
- Fold the main piece and the lining right sides together. Pin or clip and then sew edge with a ¼” seam allowance.
- To sew handle on, turn outer main piece right side out. Place handle on the seam of the outer piece. Pin handle on the bottom and top of the main piece. Baste stitch to stay in place.
- On both the outer main piece and lining main piece, fold down the top edge 3/8” wrong side to wrong side. Press for fold to stay in place.
- To sew bottom, start by placing the outer piece inside the lining piece with right sides together. Leave about an inch of fabric at the bottom of each. In addition, tuck the bottom strips to be between the two fabrics.
- Start by pinning the fabric by the sewn-on straps. Then, you are going to tuck the outer fabric in a bit and bring one of the straps directly over to the other side. Pin this between the outer piece and lining. Do the same with the other strap. This should create an “X” with the straps.
- Sew around the bottom which will secure the outer piece and lining, and this will also secure the bottom straps.
- Once sewn, flip right side out.
- Pin the folded and pressed top pieces. Make sure that the top piece is completely folded over on both the lining and outer piece. Topstitch around the entire top to secure the two pieces together.
Recommended Products
As an Amazon Associate and member of other affiliate programs, I earn from qualifying purchases.
-
 SINGER 00226 Assorted Safety Pins, Multisize, Nickel Plated, 50-Count
 -
Brother XM2701 Sewing Machine, Lightweight, Full Featured, 27 Stitches, 6 Included Feet
-
Fiskars Crafts 95237097J Rotary Sewing Cutting Set (3 Piece), Grey
-
LIVINGO Premium Tailor Scissors Heavy Duty Multi-Purpose Titanium Coating Forged Stainless Steel Sewing Fabric Leather Dressmaking Softgrip Shears Professional Crafting (9.5 INCH)


