
I love bags and I am constantly looking for new designs and patterns. I found one I love and can’t wait to show you. Today on Beginner Sewing Projects, I’m going to show you How To Make A Japanese Knot Bag! A Japanese Knot Bag is a tote bag with asymmetrical handles. The longer handle is meant to slip into the smaller handle to close the bag and form the “knot”. The Japanese Knot Bag can be a reusable bag when shopping to carry fruits and vegetables or a great tote bag for everyday use. I even use mine as a small purse or a cosmetic bag when I travel and it works great. I always get lots of compliments on this bag. The included free sewing pattern makes it simple to cut out your fabric shapes and sew this up without any hassle. I picked out some cute print fabric I love but you could use whatever fabric best fits your mood. I have a few of these bags now and I use them for all kinds of things. They are great for anytime you are on the go. Plus, it is hard to find a small bag that looks great.

You’ll only need a few supplies for this sewing project. You’ll need about half of a yard of fabric for your outer fabric and the same amount for your lining fabric. Aside from your fabric, you’ll need some basic supplies like matching thread, some scissors or a rotary cutter, mat, ruler, some pins or sewing clips, and of course your sewing machine. You will also need something to mark out the pattern like some chalk or a washable fabric marker. Gather up your supplies and let’s get started!

Printable PDF Version of how to make a Japanese Knot Bag - This PDF version has been optimized for printing and you won’t need to access the internet every time you want to make it. If you would like to purchase an ad free printable version of this sewing pattern & tutorial, please visit our Etsy Shop listing for Japanese Knot Bag - PDF Download & you can purchase a PDF downloadable version of this knot bag pattern & tutorial or you can keep reading for the free version of this tutorial.
What You’ll Need:

- Japanese Knot Bag Pattern
- ½ yard of printed cotton for outer layer
- ½ yard of cotton lining fabric
- Matching Thread
- Scissors
- Rotary Cutter, Cutting Mat, & Ruler
- Washable marker
- Sewing Machine
- Iron or heat press
- Thread Clippers
- Sewing Clips
How To Make A Japanese Knot Bag

Step 1: Cut Pattern Pieces
To start this how to make a Japanese knot bag sewing tutorial, print off and assemble the included free pattern from this post. Once you have your pattern ready, use it to cut out TWO pieces of your outer fabric mirrored. This means you will cut one piece of fabric with the pattern piece facing up and then flip the pattern piece down and cut another piece of fabric. Essentially the pieces will be mirrored.

Next, using the same pattern piece cut out TWO lining pieces. You will have four pieces by the end. Your pieces should look like the photo above once you are done cutting.

Mark a small notch on each fabric piece where it is noted on the pattern piece like you see above. If the pattern you used doesn’t have noted notches, then mark on each side of the bag the point where the neckline of the handle starts. This point is where you will start sewing in the next stage. The main thing is making sure you have the same mark on all four pieces as it will help when making the handle.

Step 2: Sew the Bottom of the Bag
Pin or clip the lining pieces right sides together and pin or clip the outer pieces right sides together.

Now on this how to make a Japanese knot bag sewing tutorial, it’s time to sew! Using a ¼” seam allowance, sew the bottom of the lining and the outer pieces from the first notch to the second notch.

Step 3: Cut Notches
Cut small notches around the curves of each piece.

Step 4: Insert Lining
Take the lining piece and turn in right side out. Next, insert the lining into the outer piece which is still wrong side out. This means that the right side of the lining is facing the right side of the outer fabric. Then sew the very top of the handles together.

Step 5: Sew Neckline of Bag
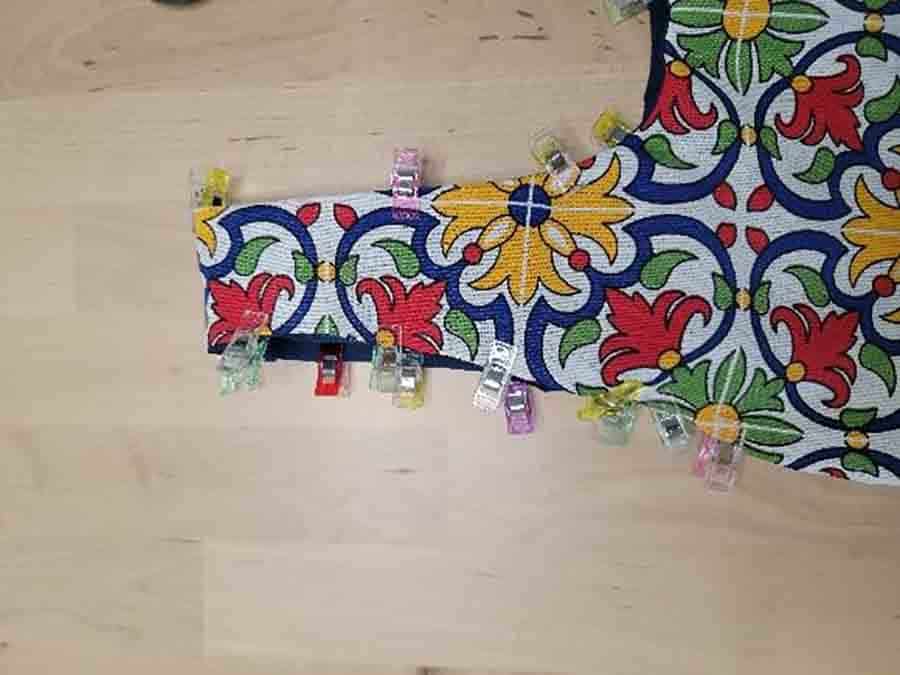
Clip or pin the “neckline” of the two layers together.

Using a ¼” seam allowance, sew along the “neckline” of the bag.

Step 6: Flip Right Side Out
Flip the bag right side out through the handles of the bag.

The patterned side of the outer layer should be on the outside.
Step 7: Topstitch Handle
Fold the open edges of the outer and inner layer under about ¼” and then press and pin or clip.

Topstitch 1/8” around the bag handles making sure to secure the lining to the outer layer.

That is it! Now you know how to make a Japanese knot bag! You can now use your Japanese Knot Bag while shopping or just carry items in your everyday routine. I love this bag. It works so great and I always get lots of compliments on it. If you have been wanting a new sewing project to take your sewing skills to the next level, this is a wonderful sewing project to do. It just looks so cute and is the perfect size for what I need.

If you liked learning how to make a Japanese knot bag, make sure to pin it to your favorite Pinterest board or share it with friends on social media. If you decide to make this simple project on your own, be certain that you take a picture afterward and tag us on social media as we love seeing the fabrics and color choices that people use!
How To Make A Japanese Knot Bag

Sew this simple and unique bag for yourself. Makes a cute and trendy purse.
Materials
Tools
Instructions
- Using the pattern, cut out TWO outer layers mirrored.
- Next, using the same pattern piece cut TWO lining pieces. You will have four pieces by the end.
- Mark a small notch on each piece where it is noted on the pattern piece.
- Pin or clip the lining pieces right sides together and pin or clip the outer pieces right sides together.
- Using a ¼” seam allowance, sew the bottom of the lining from the first notch to the second notch. Complete these steps with the outer layer as well.
- Cut small notches around the curves of each piece.
- Take the lining piece and turn in right side out. Next, insert the lining into the outer piece which is still wrong side out. This means that the right side of the lining is facing the right side of the outer fabric.
- Sew the very top of the handles together.
- Clip or pin the “neckline” of the two layers together.
- Using a ¼” seam allowance, sew along the “neckline” of the bag.
- Flip the bag right side out through the handles of the bag. The patterned side of the outer layer should be on the outside.
- Fold the open edges of the outer and inner layer under about ¼” and then press and pin or clip.
- Topstitch 1/8” around the bag handles making sure to secure the lining to the outer layer.
- Enjoy!
Recommended Products
As an Amazon Associate and member of other affiliate programs, I earn from qualifying purchases.
-
 RUIZHEN Fat Quarters Fabric Bundles (7pcs,18 x 22 inch) Bowknot,Pinecone,Leaf Print Cotton Quilting Fabric for Sewing Green
 -
SINGER 00276 Assorted Hand Needles in Compact, 25-Count,Assorted 25/Pkg
-
Fiskars Crafts 95237097J Rotary Sewing Cutting Set (3 Piece), Grey
-
LIVINGO Premium Tailor Scissors Heavy Duty Multi-Purpose Titanium Coating Forged Stainless Steel Sewing Fabric Leather Dressmaking Softgrip Shears Professional Crafting (9.5 INCH)


