
My favorite holiday is Christmas! I love gift-giving, hot chocolate, gingerbread houses, and it is so fun to decorate! It’s even more fun to hand-make those decorations. Today, I’m going to show you How To Make A Christmas Table Runner! I love all things Christmas. I have been looking for something other than small gift ideas and I finally gave up and came up with this design. I love how cute it turned out and am so excited to share it with you. This project is simple to do, but it does have quite a lot of steps. Take your time and have fun and you’ll be done in no time. I used a cutting machine, but if all you have are scissors and a sewing machine you’ll be fine. The included free pattern makes it simple to cut out the size of your runner as well as all the applique pieces. We worked to make this as easy as possible, so print the pattern to the correct scale and you’ll be good to go. Pick out some cute fabric and make sure you have enough to do the full table runner.

You’ll need some extra for the binding as well. I also like to use quilt batting to make this lay on the table better. Gather up your supplies from the list below and let’s get started!

What You’ll Need:

- 1 yard woven fabric for front and back main fabric
- 1/2 yard or a fat quarter for binding or 3-4 yards of binding
- 1/2 yard for the border strips
- Scraps of fabric for applique pieces
- Quilt Batting
- Matching Thread
- Free Christmas Table Runner Pattern
- Walking Foot (optional)
- Heat N Bond Lite
- Scissors
- Rotary Cutter, Cutting Mat, & Ruler
- Iron or heat press
- Thread Clippers
- Sewing Clips
- Sewing Machine
- Cricut Cutting Machine
How To Make A Christmas Table Runner

Step 1. Wash and Iron your fabric
After you buy your fabric from the store and bring it home, wash it according to the washing instructions and then iron it really well. This will preshrink your fabric and having crisp ironed fabric will make working with your fabric easier along the way. If you forget to wash your fabric before cutting and assembling, it will become distorted when you go to wash it later. Plan your fabrics and quilting. Use the Christmas Table Runner template to color in the colors you want to use, the applique technique you want to use, and how you want to quilt your layers together. On mine, the trees have different types of applique techniques indicated by the blue pen lines. The swirls in the white area is how I’m going to quilt my table runner pieces together. I also included a blank table runner template in case you want to create your own applique pieces.

Step 2. Cut your table runner pieces (not the applique pieces)
The printable pattern includes all the measurements of fabric you need cut out, PDF templates for the applique pieces, cut files if you want to use your cutting machine to cut the applique pieces out, and a template of the finished table runner so you can plan out your fabrics ahead of time. Use these resources to plan and cut all your pieces. You’ll need the following pieces:
- Backing Fabric – 12.5” x 42”
- Front middle Fabric – 8.5” x 38.5”
- Top and Bottom Strips – 2.75” x 38.5”
- Side Strips – 2.75” x 12.5”
- Binding – 3.5-4 yards
- Batting – 13” x 43”
Step 3. Cut your applique pieces

I’m going to show you two ways to cut your applique pieces. By hand, and with a cutting machine. I will be using a Cricut Maker. Why should you use an adhesive like Heat N Bond Lite when you are appliqueing? This allows you to adhere the shapes to your project so they don’t move around. The Heat N Bond Lite is recommended for applique that you want to sew through. It is not strong enough to glue the fabrics together permanently, just temporarily. If you don’t want to sew your applique down, you can use Heat N Bond Ultra and it will be very secure and you don’t need to sew it down at all. You are not supposed to sew through Heat N Bond Ultra because it will gum up your needle and could break it.

When cutting these out by hand, you’ll want to print out the applique templates found in the Christmas Table Runner file. Adhesive like Heat N Bond has a paper side and a glue side. You need to trace the appliques onto the paper side of the adhesive. I used a light pad so I could see the lines through the paper, or you could use a window during the day for the same effect. Once all the pieces are traced onto the paper side of the adhesive, do a rough cut around your shapes.

Next, cut out your fabric pieces slightly larger than your adhesive templates and iron the glue side onto the wrong side of fabric, following the instructions that came with your product. Once you have the adhesive adhered to your fabric, cut along the tracing lines that you made.

The Cricut Explore can cut fabric with the fine point blade, but it has to be bonded, which means it needs a backing on it, like the Heat N Bond. The Cricut Maker can cut fabric with the fine point blade or the rotary cutter. If you are using the fine point blade, the fabric needs to be bonded, like with the Cricut Explore. If you are using the rotary cutter, the fabric does not need to be bonded, but it also can be bonded.

Because I am cutting out applique pieces, I need them to have the Heat N Bond on the back anyways. So I added Heat N Bond without tracing anything on the paper backing. I made my pieces slightly bigger than my images that I am going to cut.

Then, the paper backing needs to be removed, and the fabric is placed face-up on the pink fabric mat. I then placed my fabric on my mat and I cut them out with my rotary cutter. The material section I used was bonded cotton. I love the rotary cutter wheel with my Cricut Maker. This feature of the Cricut Maker made me love my Maker even more because it was able to cut small cuts and smooth rounded edges, that wouldn’t have looked as good if I cut them by hand.

For the Christmas Table Runner, you’ll need 4 large trees and stumps, 2 small trees and stumps, and 2 sets of gnomes.

Step 4. Assemble the table runner top
Sew the edges of the table runner top to the middle fabric. I chose to piece together two different patterns of gray fabric to make my strips, but you could certainly just use one solid piece of fabric.

Start by sewing the top and bottom strips to the main fabric.

Then add the side strips. Sew & press your seams to the outside.

Step 5. Add the applique pieces
Place the applique pieces onto the table runner top and iron them in place. I did not add the nose and shoes to the gnome yet. Make sure you remove the paper backing if you haven’t already, before ironing them on. Then applique your pieces in place. There are a couple ways you can applique your pieces onto your table runner top. You can do a straight stitch an 1/8″ from the edge of your shape. Or you can do a zig zag stitch around the edge of your shape. On my table runner, I mixed and matched to add some texture.

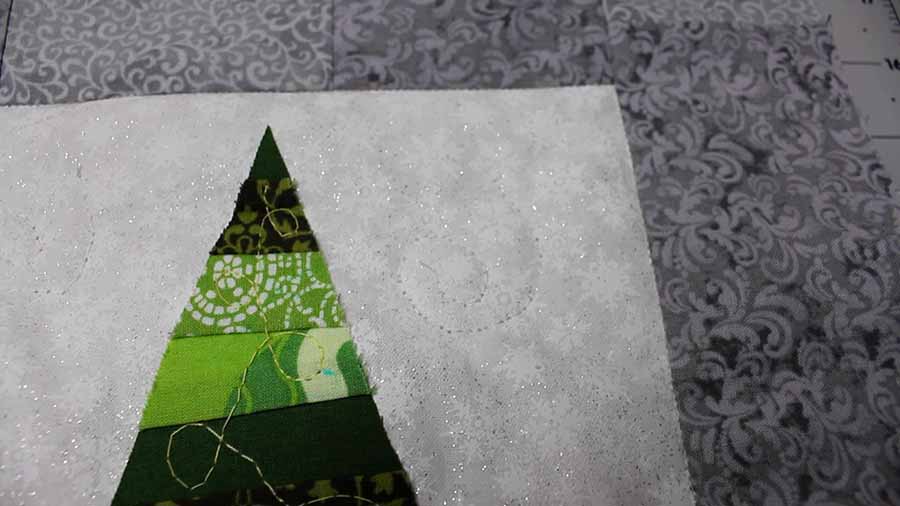
Here is one of my trees with a straight stitch applique technique. I chose to do two rows of stitching.

Here is another one with the zig zag stitch. If you choose to do a zig zag stitch, practice on a scrap piece of fabric first so you can get the size and length right. You don’t want the zig zags too fat or dense. The zig zag stitch needs to go just outside the edge of the applique piece like in the picture.

For the gnome, I did a zig zag on the hat and body, and I did a straight stitch on the beard because of all the pivoting that needs to be done around all the points.

I then added the nose and shoes and appliqued them on with a straight stitch. Alternatively, you could use the Heat N Bond Ultra so you don’t have to sew them on.

You’ll notice that each end of my table runner has the applique scene facing different directions. That way, no matter what side of the table you’re sitting on, the appliques are facing you.

Step 6. Quilt the Christmas Table Runner
Now, we need to make a quilt sandwich. This is done by laying the backing fabric face down, then the quilt batting which is slightly larger than the front and back fabrics, and finally the table runner top is face up. Use pins to pin all these layers together.

First, quilt all the pieces together by stitching in the ditch between the border fabric and the main fabric. It’s best to use a walking foot. A walking foot helps all the pieces of your quilt to stay in place so there is no moving or bunching of the layers. It’s not absolutely necessary, but if you find it difficult to keep all your layers in place, try a walking foot.
Then, quilt with swirls scattered throughout the white background fabric to make it look like snow swirling around. To create the swirls, you need to be able to free-hand quilt with your machine. Your machine needs to have the ability to drop the feed dogs or cover them with a darning plate. You will also need a darning foot. This allows you to see your work as you are going. After it is all quilted together, trim the excess batting.

Step 7. Create your binding
You can either buy binding at the store or make your own. I chose to make my own. To know how much binding you need, use this equation. Add the length of all your edges together to get the perimeter, plus 10 inches. The extra 10 inches will give you an overlap to work with at the end when you join the two ends together. Mine is 43″ by 12.5″. I’m rounding up to 43″x13″. So 43+43+13+13+10=122 inches. Then divide by 12 to get how many feet you need, and divide again by 3, to see how many yards you need. 122/12 is 10.16 feet. 10.16/3 is 3.3 yards. So I’m going to make sure I have 3.5 to 4 yards of binding.
I was able to use an 18″ square to get enough binding for this whole table runner. So you could use a fat quarter or cut an 18″ square out of your favorite fabric. I really like the ability to make my own binding because I can use any fabric pattern I like, instead of being limited by what the store has. Attach your binding however you like. You can machine sew your binding or hand sew it on. Now you are all done! I really love how cute this turned out. I was super excited about the gnome because they are so adorable.

If you liked learning how to make a Christmas table runner, make sure to pin it to your favorite Pinterest board or share it with friends on social media. If you decide to make this simple project on your own, make certain that you take a picture afterward and tag us on social media as we love seeing the fabrics and color choices that people use!
How To Make A Christmas Table Runner

Sew your own adorable holiday decoration with this cute Christmas table runner. I love how this turned out!
Materials
Tools
Instructions
- Wash and Iron your fabric
- Cut your table runner pieces (not the applique pieces)
- Cut your applique pieces
- Adhesive like Heat N Bond has a paper side and a glue side. You need to trace the appliques onto the paper side of the adhesive.
- Once all the pieces are traced onto the paper side of the adhesive, do a rough cut around your shapes.
- Next, cut out your fabric pieces slightly larger than your adhesive templates and iron the glue side onto the wrong side of the fabric, following the instructions that came with your product. Once you have the adhesive adhered to your fabric, cut along the tracing lines that you made.
- Then, the paper backing needs to be removed, and the fabric is placed face up on the pink fabric mat.
- I then placed my fabric on my mat and I cut them out with my rotary cutter. For the Christmas Table Runner, you’ll need 4 large trees and stumps, 2 small trees and stumps, and 2 sets of gnomes.
- Assemble the table runner top by sewing the edges of the table runner top to the middle fabric. Press your seams to the outside.
- Add the applique pieces
- Place the applique pieces onto the table runner top and iron them in place. Then iron your pieces in place.
- Add the quilting by laying the backing fabric face down, then the quilt batting which is slightly larger than the front and back fabrics, and finally the table runner top is face up.
- Use pins to pin all these layers together. First, quilt all the pieces together by stitching in the ditch between the border fabric and the main fabric.
- Then, quilt with swirls scattered throughout the white background fabric to make it look like snow swirling around.
- Trim excess batting.
- Cut and sew on the binding.
- Enjoy!