
If you have been looking for a super simple and useful project to make, we have the perfect one for you. Today on Beginner Sewing Projects, we are going to show you How To Make A Lined Tote Bag! You can use this bag for so many things, like a book bag, art bag, grocery bag, etc. You can also adjust the size very easily to the size you need. And having a cute bag is a lot of fun to carry around. This is a great project if you’ve never sewn a bag before. You’ll learn the techniques you need to know to sew a simple bag. This will help you sew more complicated bags later on. Everyone can use an extra tote bag or two. I keep some of these in each of the cars, usually for the kids. Whether they need something to put dirty clothes or shoes in after practice or just as an extra bag to carry all their stuff, these little tote bags are great. I love the lining on these. It makes them easy to load and unload, plus I think it makes them a little extra sturdy.

You’ll only need a few supplies for this project. You’ll need some coordinating fabric for the lining and outer part of your bag. You’ll also need some thread and some basic sewing tools like fabric scissors, pins, and something to measure with. I recommend picking up a rotary cutter, mat & ruler as it makes cutting out your fabric a breeze. Once you have your supplies gathered up, let’s get started!

What You’ll Need:

- 1 yard of coordinating fabrics
- Thread
- Fabric Measuring Tape
- Thread Clippers
- Sewing Clips
- Scissors
- Pencil
- Rotary Cutter, Cutting Mat, & Ruler
- Sewing Machine
How To Make A Lined Tote Bag

Step 1. Prepare Fabric
Start this how to make a lined tote bag tutorial by washing, drying, and pressing your fabric. I find this makes it easier to cut as the fabric is nice and flat, plus the process acts as a preshrink for your fabric so your stitches don’t get messed up if you have to wash this tote bag. Using scissors or a rotary cutter, cut out your pieces per the measurements below:
Lining: 13″ x 15″ cut two
Outer Bottom: 13″ x 10″ cut two
Outer Top: 13″ x 6″ cut two
Straps: 13″ x 2.5″ cut four

Step 2. Assemble pieces
Once you have your fabric cut out, we are going to start by assembling the outer layers and the straps. Staring with the outer layer, there is a top and bottom to each side. Place the top layer onto the bottom layer, making sure they are right sides together and the raw edges are lined up.

Now on this DIY lined tote bag tutorial, head over to the sewing machine and sew these together with a 1/4″ seam allowance and press the seams open. Do this for both sides.
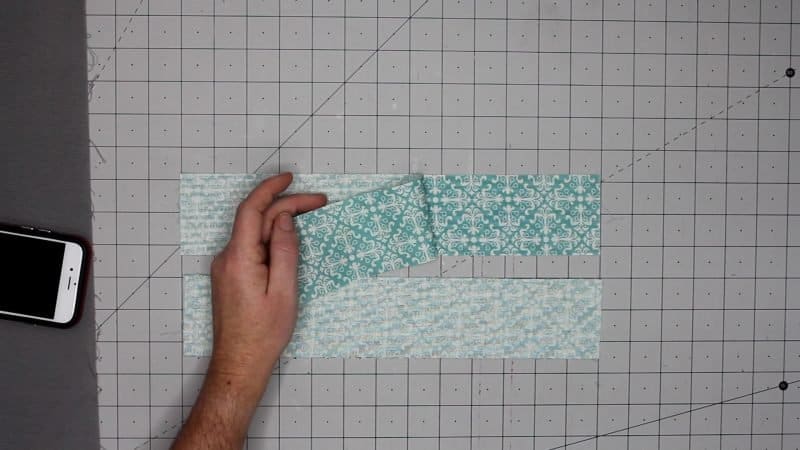
Then with the straps, place two pieces together, right sides together. Sew along the long edges with a 1/4″ seam allowance.

Turn them right side out and press with an iron. Topstitch a 1/4″ from the edge.

Step 3. Create bag pieces
Now on this how to make a lined tote bag tutorial, we will work on putting the bag itself together. Take the two outer pieces and lay them on top of each other, right sides together. Make sure the seam is lined up and clip or pin together. Sew along the left and right edges and the bottom.

Repeat this process for the lining as well.

Now we are going to turn the corners into boxed corners. This will give your bag a nice flat bottom. Take the corner from one of your bag pieces and grab the fabric from each side of your seam. Pull them apart from each other.

Then press the side seam and bottom seams together so they are touching and lined up.

Now, mark a line perpendicular to the seam, 1.5″ from the corner seam.

Sew along the line you just made, and then trim off the excess. Do this for all four corners. The two on the lining and the two on the outer fabric.

This is how you get the boxed corners at the bottom of the bags. Now we will tackle the straps. We are about halfway through this how to make a lined tote bag tutorial!

Step 4. Sew it all together
Now we can put it all together and turn it into a bag! Get your lining and straps. Your lining should be inside out. Mark three inches in from the side seams.

Take your straps and place them like this on the inside of the bag. Center the mark you just made in the middle of one end of the strap.

Then pin the strap in place. Repeat on the other end of the strap. Turn your bag over and pin the other strap in place.

Now take your outer fabric and turn it right side out.

Place the outer fabric, inside of the lining fabric.

Line up the side seams of both bag pieces and pin in place. Then line up the rest of the raw edges and pin.

Sew around the raw edges with a 1/4″ seam allowance. Leave a 3-4″ opening for turning right side out. When you get to the straps, go over them a couple times with the backstitch button, to reinforce the straps.

Next, turn the whole thing right side out.

Then stuff the lining down inside of the outer fabric.

For the last step in this how to make a lined tote bag sewing tutorial, use an iron to press the top seam flat. When you get to the opening, make sure to fold over the raw edges about 1/4″ and press. Now topstitch around the whole top of the bag.

And that’s it! Now you know how to make a lined tote bag! This bag measures about 12″ x 14″ when it’s done. Perfect for carrying books, toys, or anything else you want to put in it. Great as a grocery bag too! The lining in the tote makes it easy to dump out and clean.

If you liked learning how to make a lined tote bag, make sure to pin it to your favorite Pinterest board or share it with friends on social media. If you decide to make this simple project on your own, be certain that you take a picture afterward and tag us on social media as we love seeing the fabrics and color choices that people use!
How To Make A Lined Tote Bag

Sew your own simple tote bag with a lining. Easy to sew, great beginner project that has so many uses.
Materials
Tools
Instructions
- Cut cut fabric according to cut list.
- Place the top layer onto the bottom layer, making sure they are right sides together and the raw edges are lined up.
- Sew these together with a 1/4″ seam allowance and press the seams open. Do this for both sides.
- Then with the straps, place two pieces together, right sides together.
- Sew along the long edges with a 1/4″ seam allowance.
- Turn them right side out and press with an iron. Topstitch a 1/4″ from the edge.
- Take the two outer pieces and lay them on top of each other, right sides together. Make sure the seam is lined up and clip or pin together.
- Sew along the left and right edges and the bottom. Repeat this for the lining as well.
- Now we are going to turn the corners into boxed corners. Take the corner from one of your bag pieces and grab the fabric from each side of your seam. Pull them apart from each other.
- Then press the side seam and bottom seams together so they are touching and lined up.
- Mark a line perpendicular to the seam, 1.5″ from the corner seam.
- Sew along the line you just made, and then trim off the excess. Do this for all four corners.
- Get your lining and straps. Your lining should be inside out. Mark three inches in from the side seems.
- Take your straps and place them like this on the inside of the bag. Center the mark you just made in the middle of one end of the strap. Then pin the strap in place.
- Repeat on the other end of the strap. Turn your bag over and pin the other strap in place.
- Now take your outer fabric and turn it right side out.
- Place the outer fabric, inside of the lining fabric.
- Line up the side seams of both bag pieces and pin in place. Then line up the rest of the raw edges and pin.
- Sew around the raw edges with a 1/4″ seam allowance. Leave a 3-4″ opening for turning right side out. When you get to the straps, go over them a couple times with the backstitch button, to reinforce the straps.
- Next, turn the whole thing right side out.
- Then stuff the lining down inside of the outer fabric.
- Use an iron to press the top seam flat. When you get to the opening, make sure to fold over the raw edges about 1/4″ and press. Now topstitch around the whole top of the bag.
- Enjoy