
Today on Beginner Sewing Projects, we’re going to show you how to Sew A Hooded Towel For Baby The Easy Way! A hooded towel keeps baby warm and dry, and it is super easy to sew! Follow this step by step tutorial with photos to make one for all the babies you know. This poncho style grows a bit with the baby, so they can enjoy it for a long time. Use it after bath time, at the pool, and at the beach or lake too. This sewing project is great whether you are just starting your sewing journey or a seasoned sewist. Plus, it’s just so stinking cute! It will become your go-to towel for your little one. Pick out some super soft and plush material for your towel to make it super snuggly.

This is a fantastic project for a baby shower gift. Towels and ribbon can be purchased in a ton of colors and patterns to customize the look for gender or theme. You might want to make more than one, so there is a backup when the other hooded towel is wet. Babies love the water!
Supplies For How To Sew A Hooded Towel for Baby

Towels come in a variety of colors. Choose the same color bath towel and hand towel, or have fun mixing and matching.
Be sure to use a hand towel rather than a wash cloth.
Ribbon is also available in lots of colors and designs. Give multiple hooded towels different ribbons for multiple children. Then everyone will know which one belongs to them.
You will also need basic supplies including fabric shears, thread, thread nippers and straight pins. A rotary cutter and cutting mat are recommended too. Keep reading for the full guide to creating your own hooded towel.
Instructions For How To Sew A Hooded Towel For Baby

Step 1 – Fold Towel Lengthwise
I always like to start my sewing projects by washing, drying, and ironing my fabric. This process acts as a preshrink so that your stitches hold up well when you do end up needing to wash this baby hooded towel. After you have done that, the first step on this how to sew a hooded towel for baby is to take your hand towel and fold it lengthwise with the long side touching the other long side.

Step 2 – Measure and Cut Ribbon
Next, measure and cut a piece of ribbon just longer than the longest side of the hand towel. This ribbon will give your hooded towel a cute decorative touch!

Step 3 – Align and Pin Ribbon
Lay the ribbon about an inch away from the folded edge of the hand towel. Pin the ribbon to the top layer of the towel only. You can place your ribbon wherever you like, I just thought this particular placement looked really cute.

Step 4 – Sew Ribbon to Towel
Next on this how to sew a hooded baby towel sewing tutorial, it’s time to sew! Start by unfolding the hand towel, and sew the ribbon to the towel. Stitch along both sides of the ribbon, staying as close to the edge as possible.

Step 5 – Fold Hand Towel
Now fold the hand towel the opposite way with short sides touching and the ribbon on the inside.

Step 6 – Pin and Sew Towel Sides
Pin the long sides together, and stitch about 1/4″ away from the finished edge of the towel.

You should now have a pocket with the opening where the short sides touch each other.

Step 7 – Trim Finished Edges
Using your rotary cutter and cutting mat (or scissors), trim off the finished edges along the sides of the pocket you just created. We are about halfway through this how to sew a hooded towel for baby sewing tutorial!

This will cut down on the amount of fabric you have to sew through later, as well as allow the hood to lay flatter. Be sure not to cut through your stitches!
Step 8 – Turn Right Side Out

Next turn the pocket right side out with the ribbon facing out. Straighten and smooth the towel. flat.
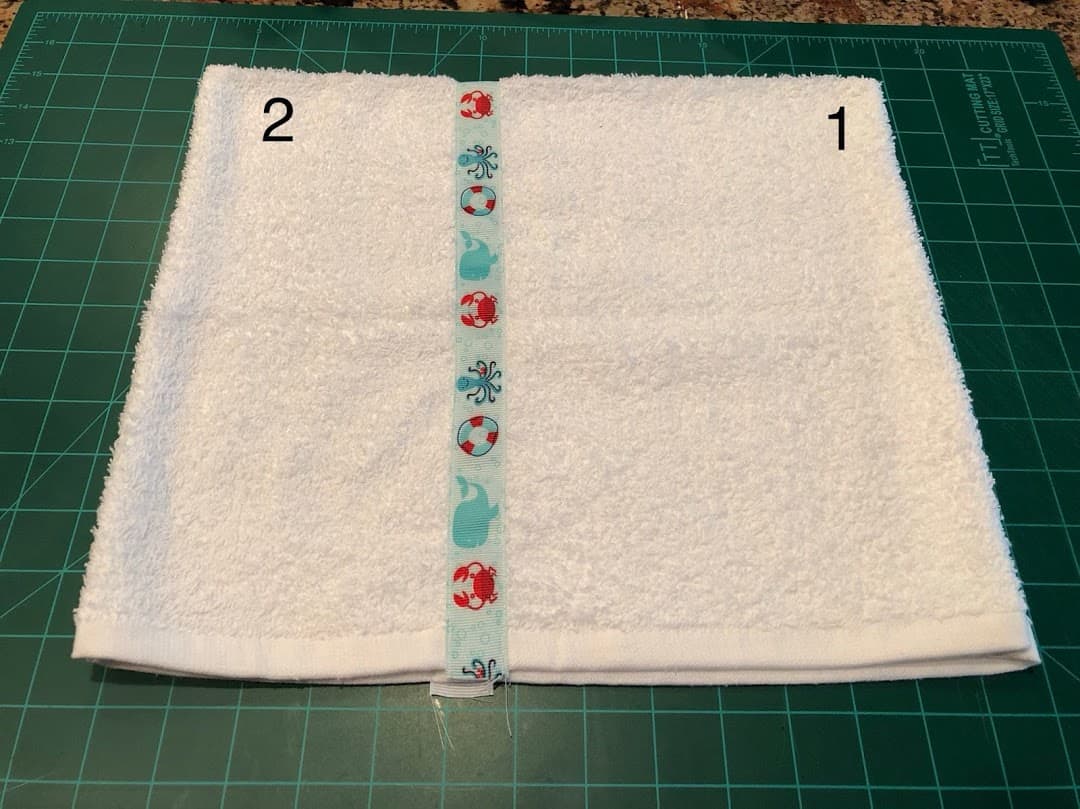
Step 9 – Fold Towel Again

Now fold corner 1 inside corner 2. See photo above for reference.

Turn and refold the towel where seams are in the center. Fold the top down into a triangle.

This creates the hood shape for our hooded towel.
Step 10 – Assemble Towel and Hood

Next, we will work on attaching the hood to the main towel fabric. Find the center of the bath towel. Lay the hood on top of the bath towel, overlapping by about 1.5″.

Step 11 – Pin
Pin the hood onto the bath towel.

Step 12 – Sew Hood
Now to attach the hood, simply sew along the bottom edge of the hood finished seams with 1/4″ seam allowance on the LEFT side of the seams.

The hood should be to the right of your needle.

Step 13 – Flip and Pin
Then flip the towel over, and pin the bath towel flap to the hood.

Step 14 – Sew Back
For the last step in our how to sew a hooded baby towel sewing tutorial, just sew with a zig zag stitch and 1/4″ seam allowance for a maximum strength hold. Backstitch several times on each end to reinforce the seam.

And that’s it! You’re done with this how to sew a hooded towel for baby sewing tutorial! Now just find a cute baby, and wrap that bundle of sweetness in their new hooded towel! I made several of these for my nieces and nephews and even keep a few at my house for when they come over.

Don’t forget to pin this project for later, and check out some more awesome sewing projects for beginners listed below.

If you loved learning how to sew a hooded towel for baby, make sure to pin it to your favorite Pinterest board or share it with friends on social media. If you decide to make this simple project on your own, make certain that you take a picture afterward and tag us on social media as we love seeing the fabrics and color choices that people use!
Hooded Towel for Baby

How to sew a hooded towel for baby the easy way.
Materials
Instructions
- Fold hand towel lengthwise.
- Cut ribbon 1/4" longer than towel.
- Pin ribbon to top layer of towel 1" from folded edge.
- Unfold towel.
- Sew ribbon down on both sides of ribbon.
- Fold hand towel with short sides touching, ribbon inside.
- Pin long sides together.
- Sew with 1/4" seam allowance along finished edge.
- Cut off finished edges. Do not cut through stitches.
- Turn towel right side out.
- Fold corner 1 inside corner 2.

- Fold towel again where seams are in the center.
- Fold top down into a triangle.
- Place hood on center of bath towel overlapping 1.5".
- Pin to hold.
- Sew bottom edge of hood with 1/4" seam allowance on left of seams.
- Flip towel over.
- Pin flap to hood.
- Sew zig zag stitch with 1/4" seam allowance.
Notes
Always backstitch at the beginning and end of sewing for maximum hold.
Recommended Products
As an Amazon Associate and member of other affiliate programs, I earn from qualifying purchases.
-
 Brother Sewing Machine, XM2701, Lightweight Sewing Machine with 27 Stitches
 -
BESTCYC 400pcs(4Styles) Mixed Colors Flower Head Pins Straight Pins Quilting Pins with Cases for Sewing Crafts DIY Projects
-
Gingher 8-Inch Knife Edge Dressmaker's Shears
-
LaRibbons Solid Color Satin Ribbon Asst. #2-10 Colors 3/8" X 5 Yard Each Total 50 Yds Per Package
-
AmazonBasics Fade-Resistant Cotton Bath Towel - Pack of 2, White
-
AmazonBasics Cotton Hand Towels - Pack of 12, White


