
We have another exciting project for you! Today on Beginner Sewing Projects, will show you how to make these fun DIY Sewing Pattern Weights. First off, how many of you know what sewing pattern weights are? To be honest I was a little shaky on what they were when I first got into sewing. Sewing pattern weights are designed to help keep your paper patterns from moving while you cut out your fabric. If you aren’t familiar with sewing patterns, you can print them out and lay them on your fabric to cut out your pieces. Pattern weights simply weigh down the pattern onto your fabric so that it doesn’t move while you cut out your fabric. You can also use them to keep your fabrics from moving around while you sew them. They are a great alternative to using straight pins or even clips with your fabrics, especially the more delicate fabrics like lace or even sequins. Although you could technically use just about anything to hold down your pattern, these little pattern weights are super cute and fun. These are “sew” easy to make and could easily be done in under an hour. When making a quick little project like this, I tend to make a few extra just to have on hand, as these would make great gifts for your sewing friends.

Are you starting to love sewing as much as we do? If so then you will not want to miss out on this fun sewing tutorial. I love finding alternative ways to add a little bit of fun to my sewing projects. Yes, you can just as easily put a sewing pin or even those easy clips in, but a sewing weight you made yourself is even cuter!! You can really personalize this great project with the fabrics you choose, whether you love your fabrics to be all matchy-matchy to your threads or choose a bunch of eclectic patterns and wild colors in your thread, these are going to be your new go-to for holding down your patters and fabrics with all of your sewing projects. My kids love to use these like bean bags and toss them around. Also, since they are made with rice as the weight, you can toss them into your microwave for a few seconds as a mini heating pack. Even though the possibilities are endless with this easy sewing project, you will feel great about knowing that you made these yourself! Keep scrolling as we jump right on into the supplies you will be needing for this project.

What You’ll Need:

- Fat quarter of fabric
- Scissors
- Matching thread
- Rotary Cutter, Mat, & Ruler
- Weighted Stuffing Beads or Rice
- Hand Sewing Needle
- Sewing Clips
For this particular sewing project I have chosen to use one of my favorite snacks as the inspiration for my fabric today. I love donuts and just could not pass up this pretty fabric. I also picked out a simple coordinating thread for the hand sewn section at the end that we will go over.
DIY Sewing Pattern Weights Tutorial

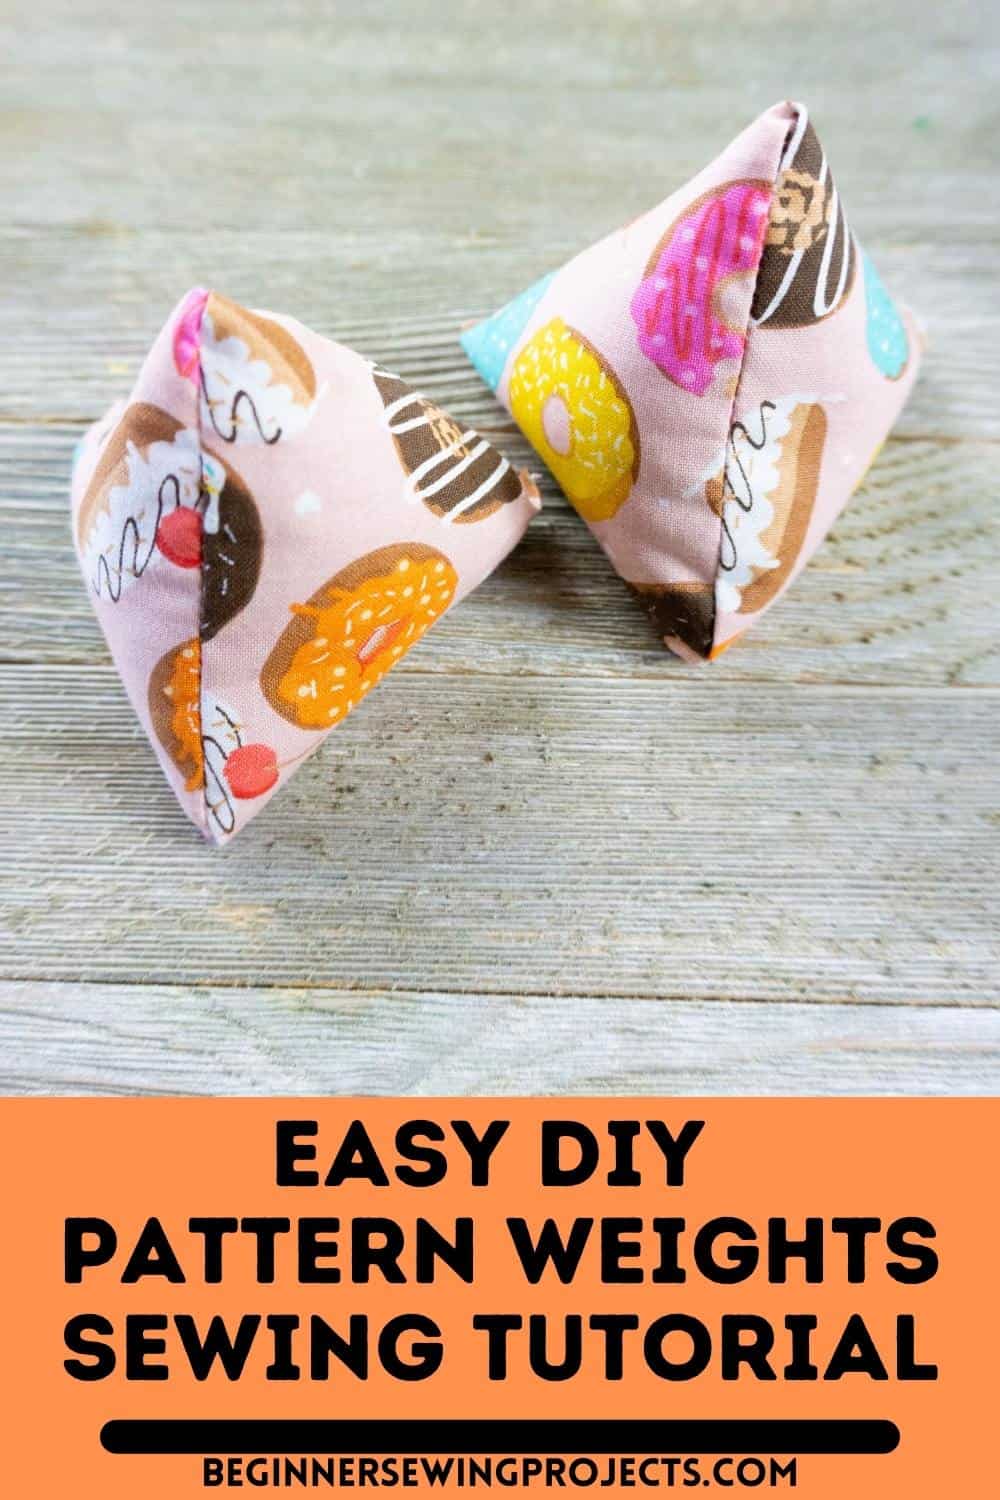
First off on this DIY pattern weights sewing tutorial, you are going to cut one piece of fabric 4 inches wide by 8 inches in length. Now a lot of sewers like to go ahead and wash their fabrics prior to cutting just in case you have a fabric that will shrink up. I do not do that every time so, it is really a personal choice.

Next, you are going to take take the cut piece of fabric and fold it in half with the right sides together on the inside. Then, stitch along the bottom and right side of the folded piece of fabric. Once you are finished, flip the fabric right side out. When I was younger, my mom used to describe what she was doing as she sewed her projects and I could never understand why she said right sides. For the longest time growing up, I thought there were right and left sides of the fabric! I have since learned the difference.

Ok, this part is a little tricky so you can go slower here if you need to. Pull the material across the bottom stitching opposite the edge stitching. By doing, so you will make the triangle look once finished.

Now, you just need to fill the triangle shape with rice. Fold over the raw edges, tuck into the open-top, and clip. These little clips have been lifesavers over the years. I used to use clothespins, but these hold a little bit better and are not near as long and floppy.

The last step in this DIY pattern weights sewing tutorial is to hand stitch the clipped edge closed and you are done.

Wow! Wasn’t that a super fun and easy tutorial on sewing pattern weights? The better sewer you become, the fast you will be able to crank out these little babies. I love how these cuties turned out! These are great for any project you are working on, plus a fun gift to give to any crafter or sewer. These are easy to use, will not stick you since they aren’t needles, and look adorable keeping your sewing projects need and straight. One of the other things I have done with mine, is use them with my hand sewing projects to place my sewing needle or straight pins if I have to walk away for a moment. No body likes to poke theirselves or sit on their needles. I can’t wait to see your completed sewing projects!
If you liked learning how to make these DIY Sewing Pattern Weights, make sure to pin it to your favorite Pinterest board or share it with friends on social media. If you decided to make this simple project on your own, make certain that you take a picture afterward and tag us on social media as we love seeing the fabrics and color choices that people use!
DIY Sewing Pattern Weights

Quick and easy weights to make cutting fabric easy! Great for all projects great or small.
Materials
Tools
Instructions
- Cut one piece of fabric 4 inches wide by 8 inches in length.
- Fold in half with the right sides together on the inside.
- Stitch along the bottom and right sides.
- Flip right side in.
- Pull the material across the bottom stitching opposite the stitching.
- This will make the triangle look once finished.
- Fill with rice.
- Tuck in the tops and clip.
- Hand stitch closed.
- Enjoy!
Recommended Products
As an Amazon Associate and member of other affiliate programs, I earn from qualifying purchases.
-
 Premium Hand Sewing Needles for Sewing Repair, 30-Count Assorted Needles with 2 Threaders, by Meiho Lives
 -
Brother Sewing Machine, XM2701, Lightweight Sewing Machine with 27 Stitches
-
LIVINGO 8" Professional Heavy Duty Tailor Fabric Scissors, Dressmaker Sewing Classic Stainless Steel Ultra Sharp Forged Shears, Bent
-
Fiskars Crafts 95237097J Rotary Sewing Cutting Set (3 Piece), Grey
-
RAILONCH 7pcs Floral Cotton Fabric 19.7"x19.7" Textile Quilting Patchwork Fabric Fat Quarter Bundles Fabric for Scrapbooking Cloth Sewing DIY Crafts Pillows (Blue)


